I’m sure you’ve seen the image view modes Github released last month. It’s a really nice way to see the differences between two versions of an image. In this article, I’ll try to explain how an image diff could be built using pure Ruby and ChunkyPNG.
If you need a more basic introduction to working with pixel data in ChunkyPNG, check out last week’s article, which I did some blob detection.
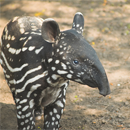
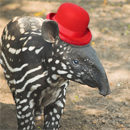
Finding differences in images works by looping over each pixel in the first image and checking if it’s the same as the pixel in the same spot in the second image. An implementation might look like this:
require 'chunky_png'

images = [
  ChunkyPNG::Image.from_file('1.png'),
  ChunkyPNG::Image.from_file('2.png')
]

diff = []

images.first.height.times do |y|
  images.first.row(y).each_with_index do |pixel, x|
    diff << [x,y] unless pixel == images.last[x,y]
  end
end

puts "pixels (total):     #{images.first.pixels.length}"
puts "pixels changed:     #{diff.length}"
puts "pixels changed (%): #{(diff.length.to_f / images.first.pixels.length) * 100}%"

x, y = diff.map{ |xy| xy[0] }, diff.map{ |xy| xy[1] }

images.last.rect(x.min, y.min, x.max, y.max, ChunkyPNG::Color.rgb(0,255,0))
images.last.save('diff.png')
Want the code? Here’s a Gist.
After loading in the two images, we’ll loop over the pixels of the first one. If the pixel is the same as the
one in the second image, we’ll add it to the diff array. When we’re done, we’ll draw a bounding box
around the area that contains the changes:
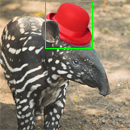
It worked! The result image has a bounding box around the hat we added to the image and the output tells us that almost 9% of the pixels in the image changed, which seems about right.
pixels (total):     16900
pixels changed:     1502
pixels changed (%): 8.887573964497042%
A problem with this approach is that it only detects change, without measuring it. It doesn’t care if the pixel it’s looking at is just a bit darker or a completely different color. If we use this code to compare one image to a slightly darker version of itself, the result will look like this:


pixels (total):     16900
pixels changed:     16900
pixels changed (%): 100.0%
This would mean that the two images are completely different, while (from a human eye’s perspective) they’re almost the same. To get a more accurate result, we’ll need to measure the difference in the pixels’ colors.
Calculating color difference
To calculate the color difference, we’ll use the the ΔE* (“Delta E”) distance metric. There are a couple of different versions of this metric, but we’ll take the first one (CIE76), since we don’t need anything too fancy. The ΔE* metric was created for the LAB color space, which was designed to approximate human vision. In this example, we’re not going to worry about converting to LAB so we’ll just use the RGB color space (note that this will mean our results will be less accurate). If you want to know more about the difference, check out this demo.
Again, we loop over every pixel in the images. If they’re different, we calculate how different they are using
the ΔE* metric and store that in the diff array. We also use that score to calculate a grayscale
color value we use on the result image:
require 'chunky_png'
include ChunkyPNG::Color


images = [
  ChunkyPNG::Image.from_file('1.png'),
  ChunkyPNG::Image.from_file('2.png')
]

output = ChunkyPNG::Image.new(images.first.width, images.last.width, WHITE)

diff = []

images.first.height.times do |y|
  images.first.row(y).each_with_index do |pixel, x|
    unless pixel == images.last[x,y]
      score = Math.sqrt(
        (r(images.last[x,y]) - r(pixel)) ** 2 +
        (g(images.last[x,y]) - g(pixel)) ** 2 +
        (b(images.last[x,y]) - b(pixel)) ** 2
      ) / Math.sqrt(MAX ** 2 * 3)

      output[x,y] = grayscale(MAX - (score * 255).round)
      diff << score
    end
  end
end

puts "pixels (total):     #{images.first.pixels.length}"
puts "pixels changed:     #{diff.length}"
puts "image changed (%): #{(diff.inject {|sum, value| sum + value} / images.first.pixels.length) * 100}%"

output.save('diff.png')
Want the code? Here’s a Gist.
Now we have a more accurate difference score. If we look at the output, we can see that less than 3% of the image was changed:
pixels (total):    16900
pixels changed:    1502
image changed (%): 2.882157784948056%
Again, a diff image is saved. This time, it shows the differences using shades of gray. Bigger changes are darker:
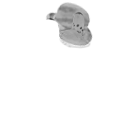
Now, let’s try the two images where the second one is slightly darker:
pixels (total):    16900
pixels changed:    16900
image changed (%): 5.4418255392228945%
Great. Now our code knows that the images are only darker, not completely different. If you look closely, you can see the difference in the result image.
What about Github?
Github uses a difference blend, which might be familiar if you’ve worked with image-editing software like Photoshop before. We loop over every pixel in the two images and calculate their difference per RGB channel:
require 'chunky_png'
include ChunkyPNG::Color

images = [
  ChunkyPNG::Image.from_file('1.png'),
  ChunkyPNG::Image.from_file('2.png')
]

images.first.height.times do |y|
  images.first.row(y).each_with_index do |pixel, x|

    images.last[x,y] = rgb(
      r(pixel) + r(images.last[x,y]) - 2 * [r(pixel), r(images.last[x,y])].min,
      g(pixel) + g(images.last[x,y]) - 2 * [g(pixel), g(images.last[x,y])].min,
      b(pixel) + b(images.last[x,y]) - 2 * [b(pixel), b(images.last[x,y])].min
    )
  end

end

images.last.save('diff.png')
Want the code? Here’s a Gist.
Using that, comparing the two images to the left would result in the diff-image on the right, nicely showing what changed:
Because the colors are compared by channel (R,G and B) instead of as one color, three scores are returned. This means the output image is in color, but comparing the channels separately can make the result less accurate.
As always, if you used this idea to build something yourself, know of a way to improve the code or have some questions or tips, be sure to let me know. If you want to know more about something I talked about, be sure to suggest it as a next article.